OpenTTD Self Regulating Networks
Prologue
Every other year or so I decide to play a game or ten of OpenTTD. Unfortunately I don't remember most of the things I figured out in the past so I have to start from first principles. In this case, first principles means reading the openttdcoop Wiki 1 and watching a bunch of LugnutsK videos. For the topic at hand I would suggest Advanced OpenTTD - Self-Regulating Networks.
Self Regulating Passenger Network
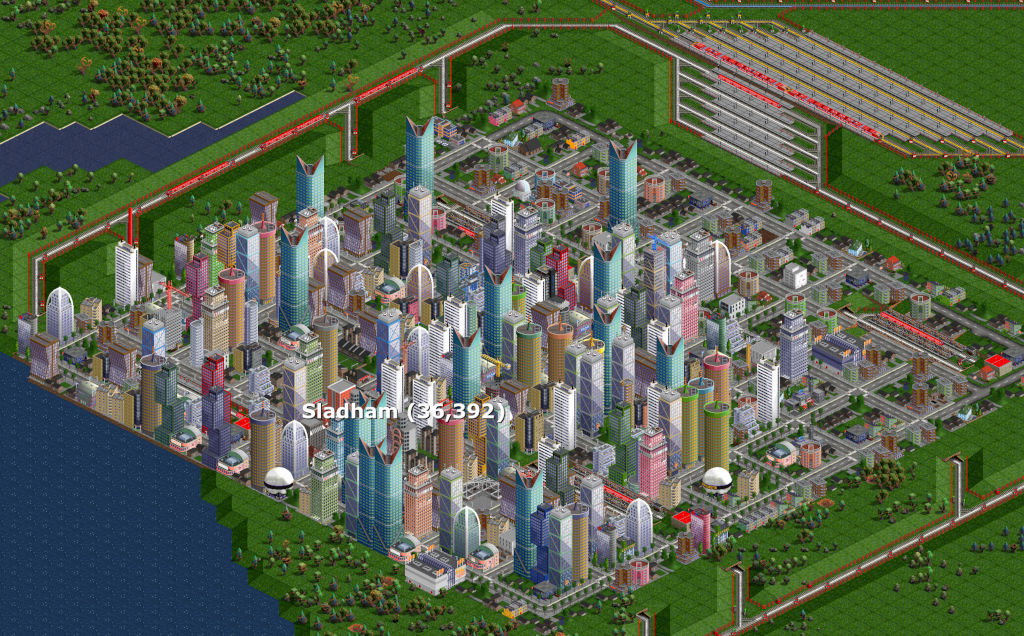
The idea of a self regulating passenger network is to grow a city and transport as many passengers out of the city as possible with the least amount of train orders.
openttdcoop calls it Gametype:ICE SBahn / Self-regulating SBahn.
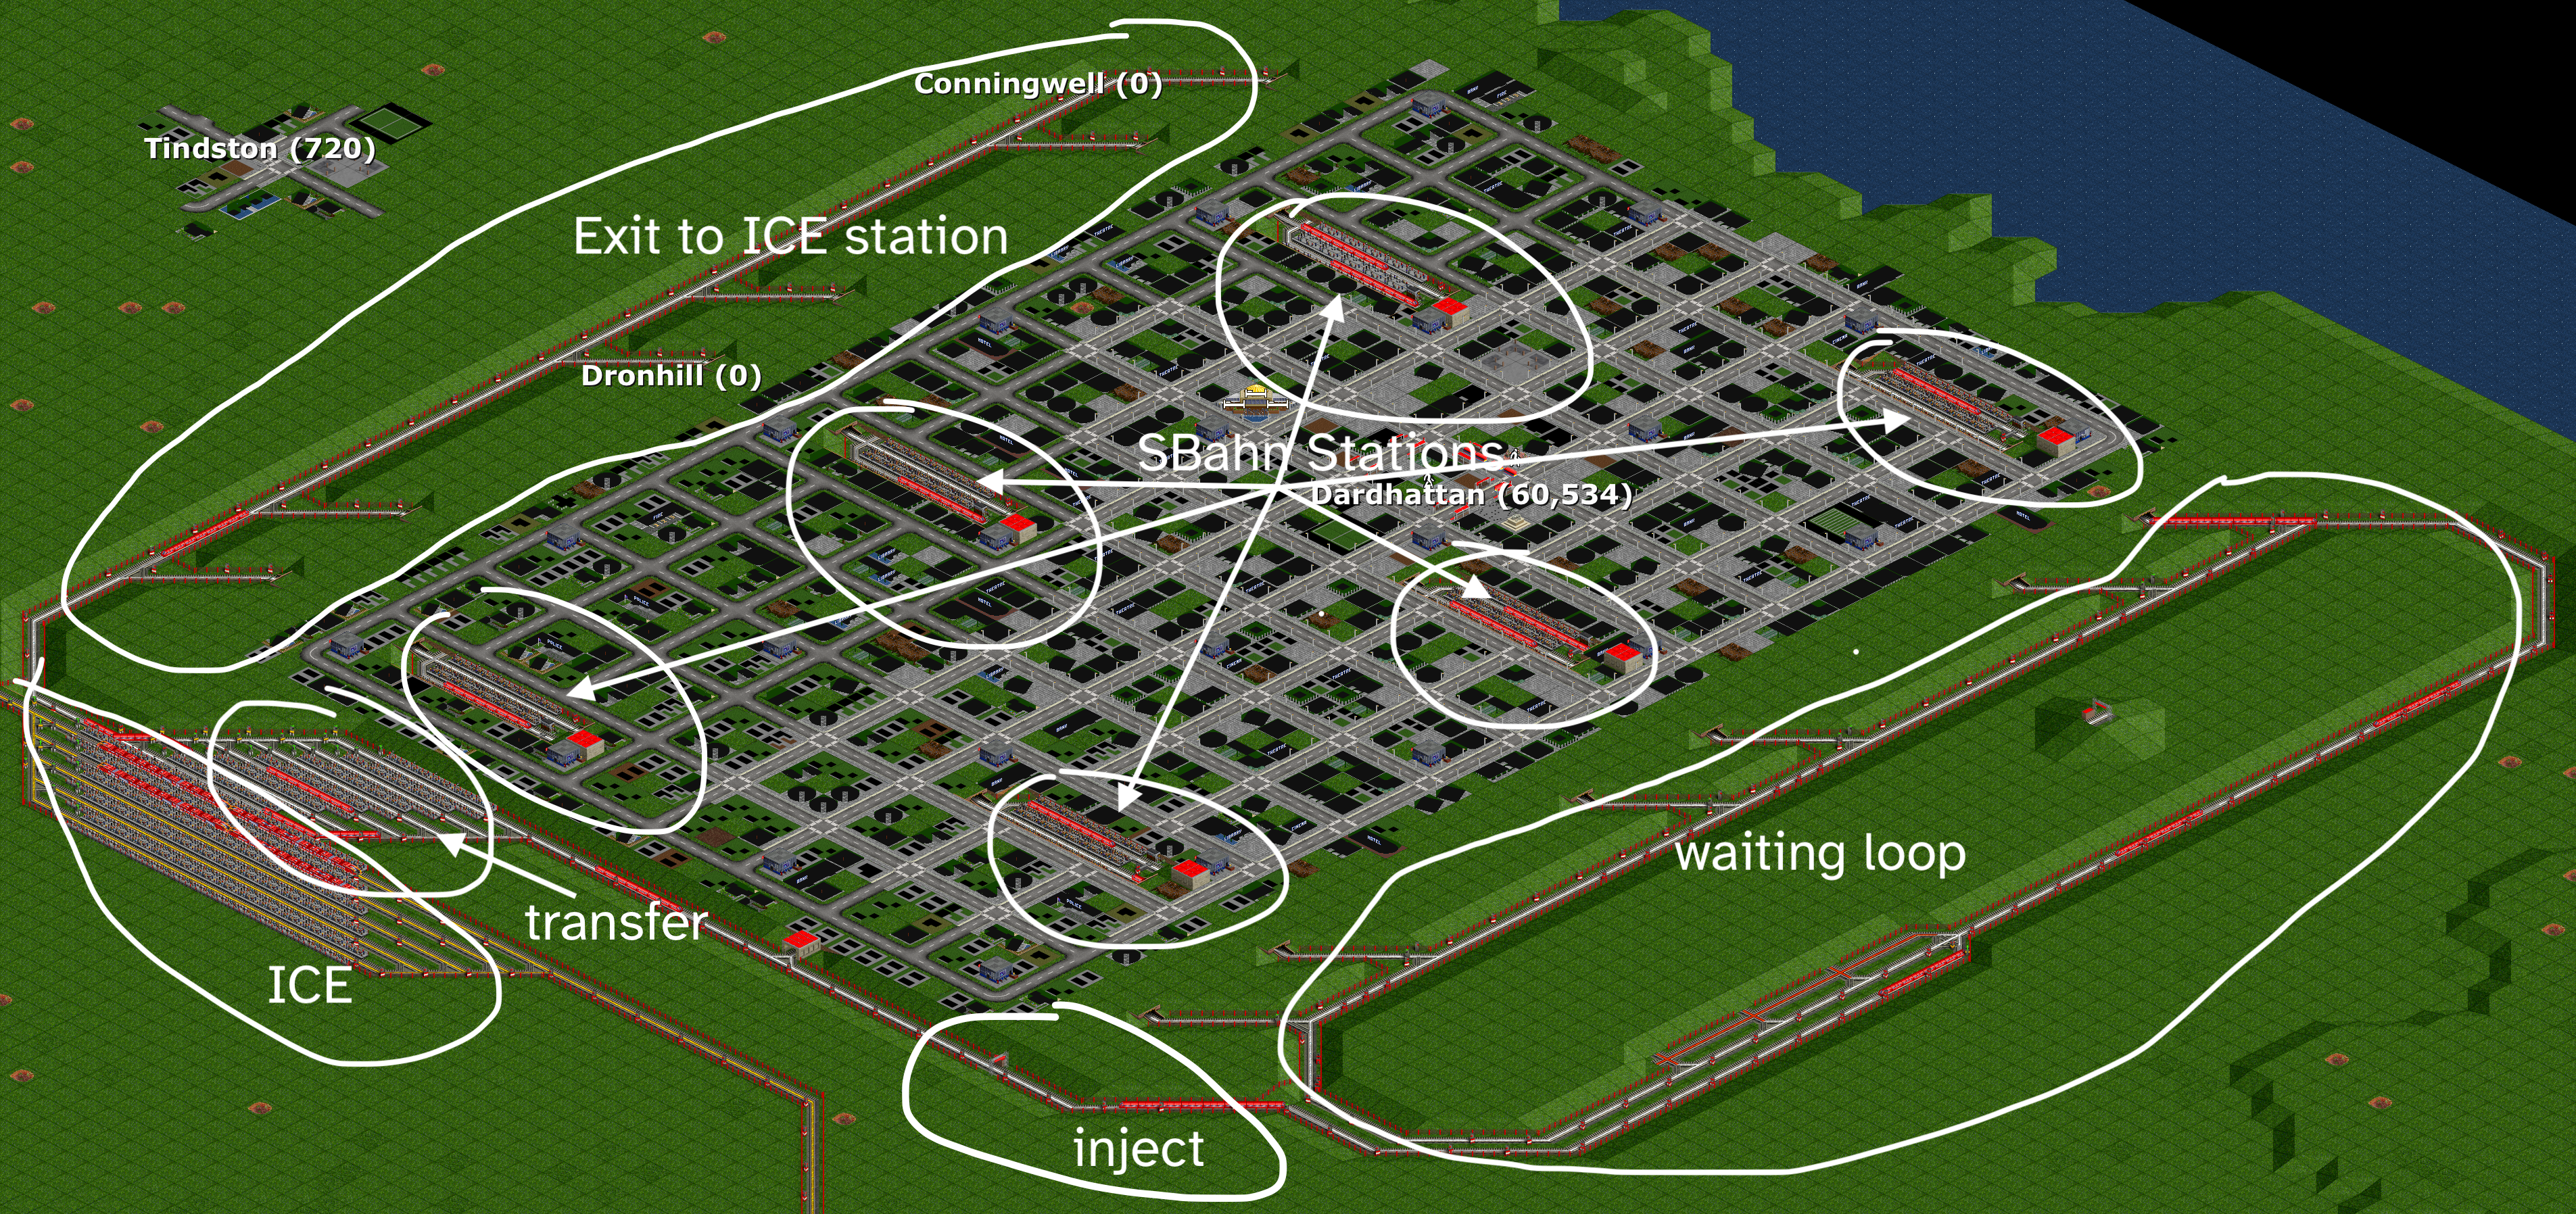
The idea is to have (SBahn) stations spread throughout the city that collect passengers. Once a train is fully loaded with passengers, it drives outside of the city to a transfer (ICE) station and transfers passengers to a waiting train that then transports the passengers to a far away city to make money.
We do not want to deal with each station individually but run the pick-up trains in a loop that automatically visits a station with a full load of passengers available.
To make all of this work we have:
- Inner-city SBahn stations
- Outside-city waiting loop for the pick-up trains
- Outside-city exit track to the transfer / ICE station
- Outside-city transfer / ICE station
- Injection mechanism from the ICE station to the waiting loop.
The pick-up trains have two orders:
- Go to transfer / ICE station and transfer passengers.
- Go to inject way-point.
The inject way-point leads to the waiting loop. From there the only way to reach the transfer station is through any of the SBahn stations. We have to arrange the SBahn stations in a way that they are only accessible when there is a full load of passengers available.
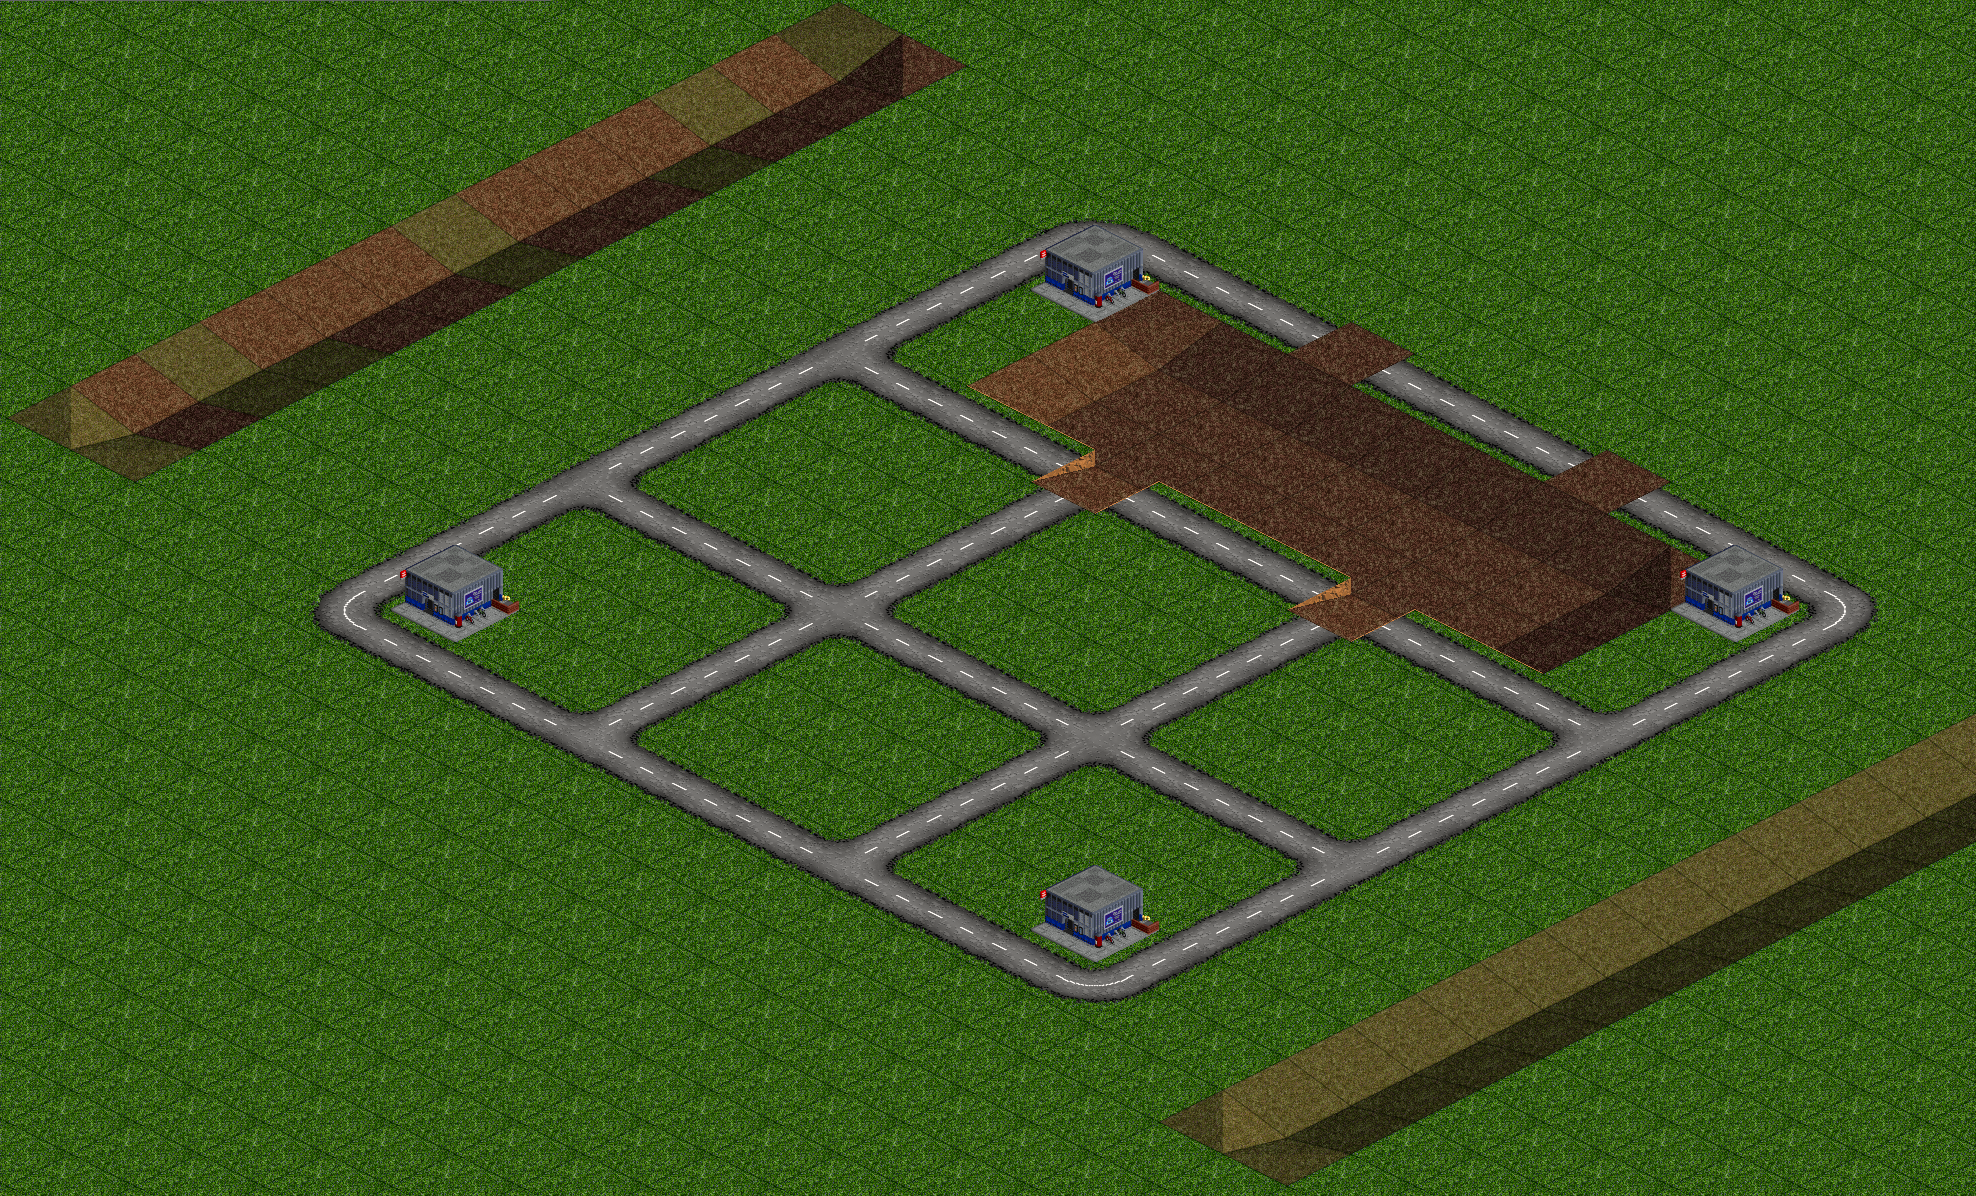
City Layout
For maximum growth and ease of putting train stations into the city we are using a 3x3 road grid. A spiral would be even better for city growth but it is annoying to put train stations into a spiral without disrupting the roads too much and creating dead-ends. Dead-ends are very bad for town growth.
We need to find a balance between station size2, city coverage, and needed capacity at the transfer station. Using spread stations covering a 5x5 block3 and having six of those works fairly well. To be able to fit tunnels in we put two in a line and have three lines4. This results in a city grid of 13x8 blocks.

Station Construction
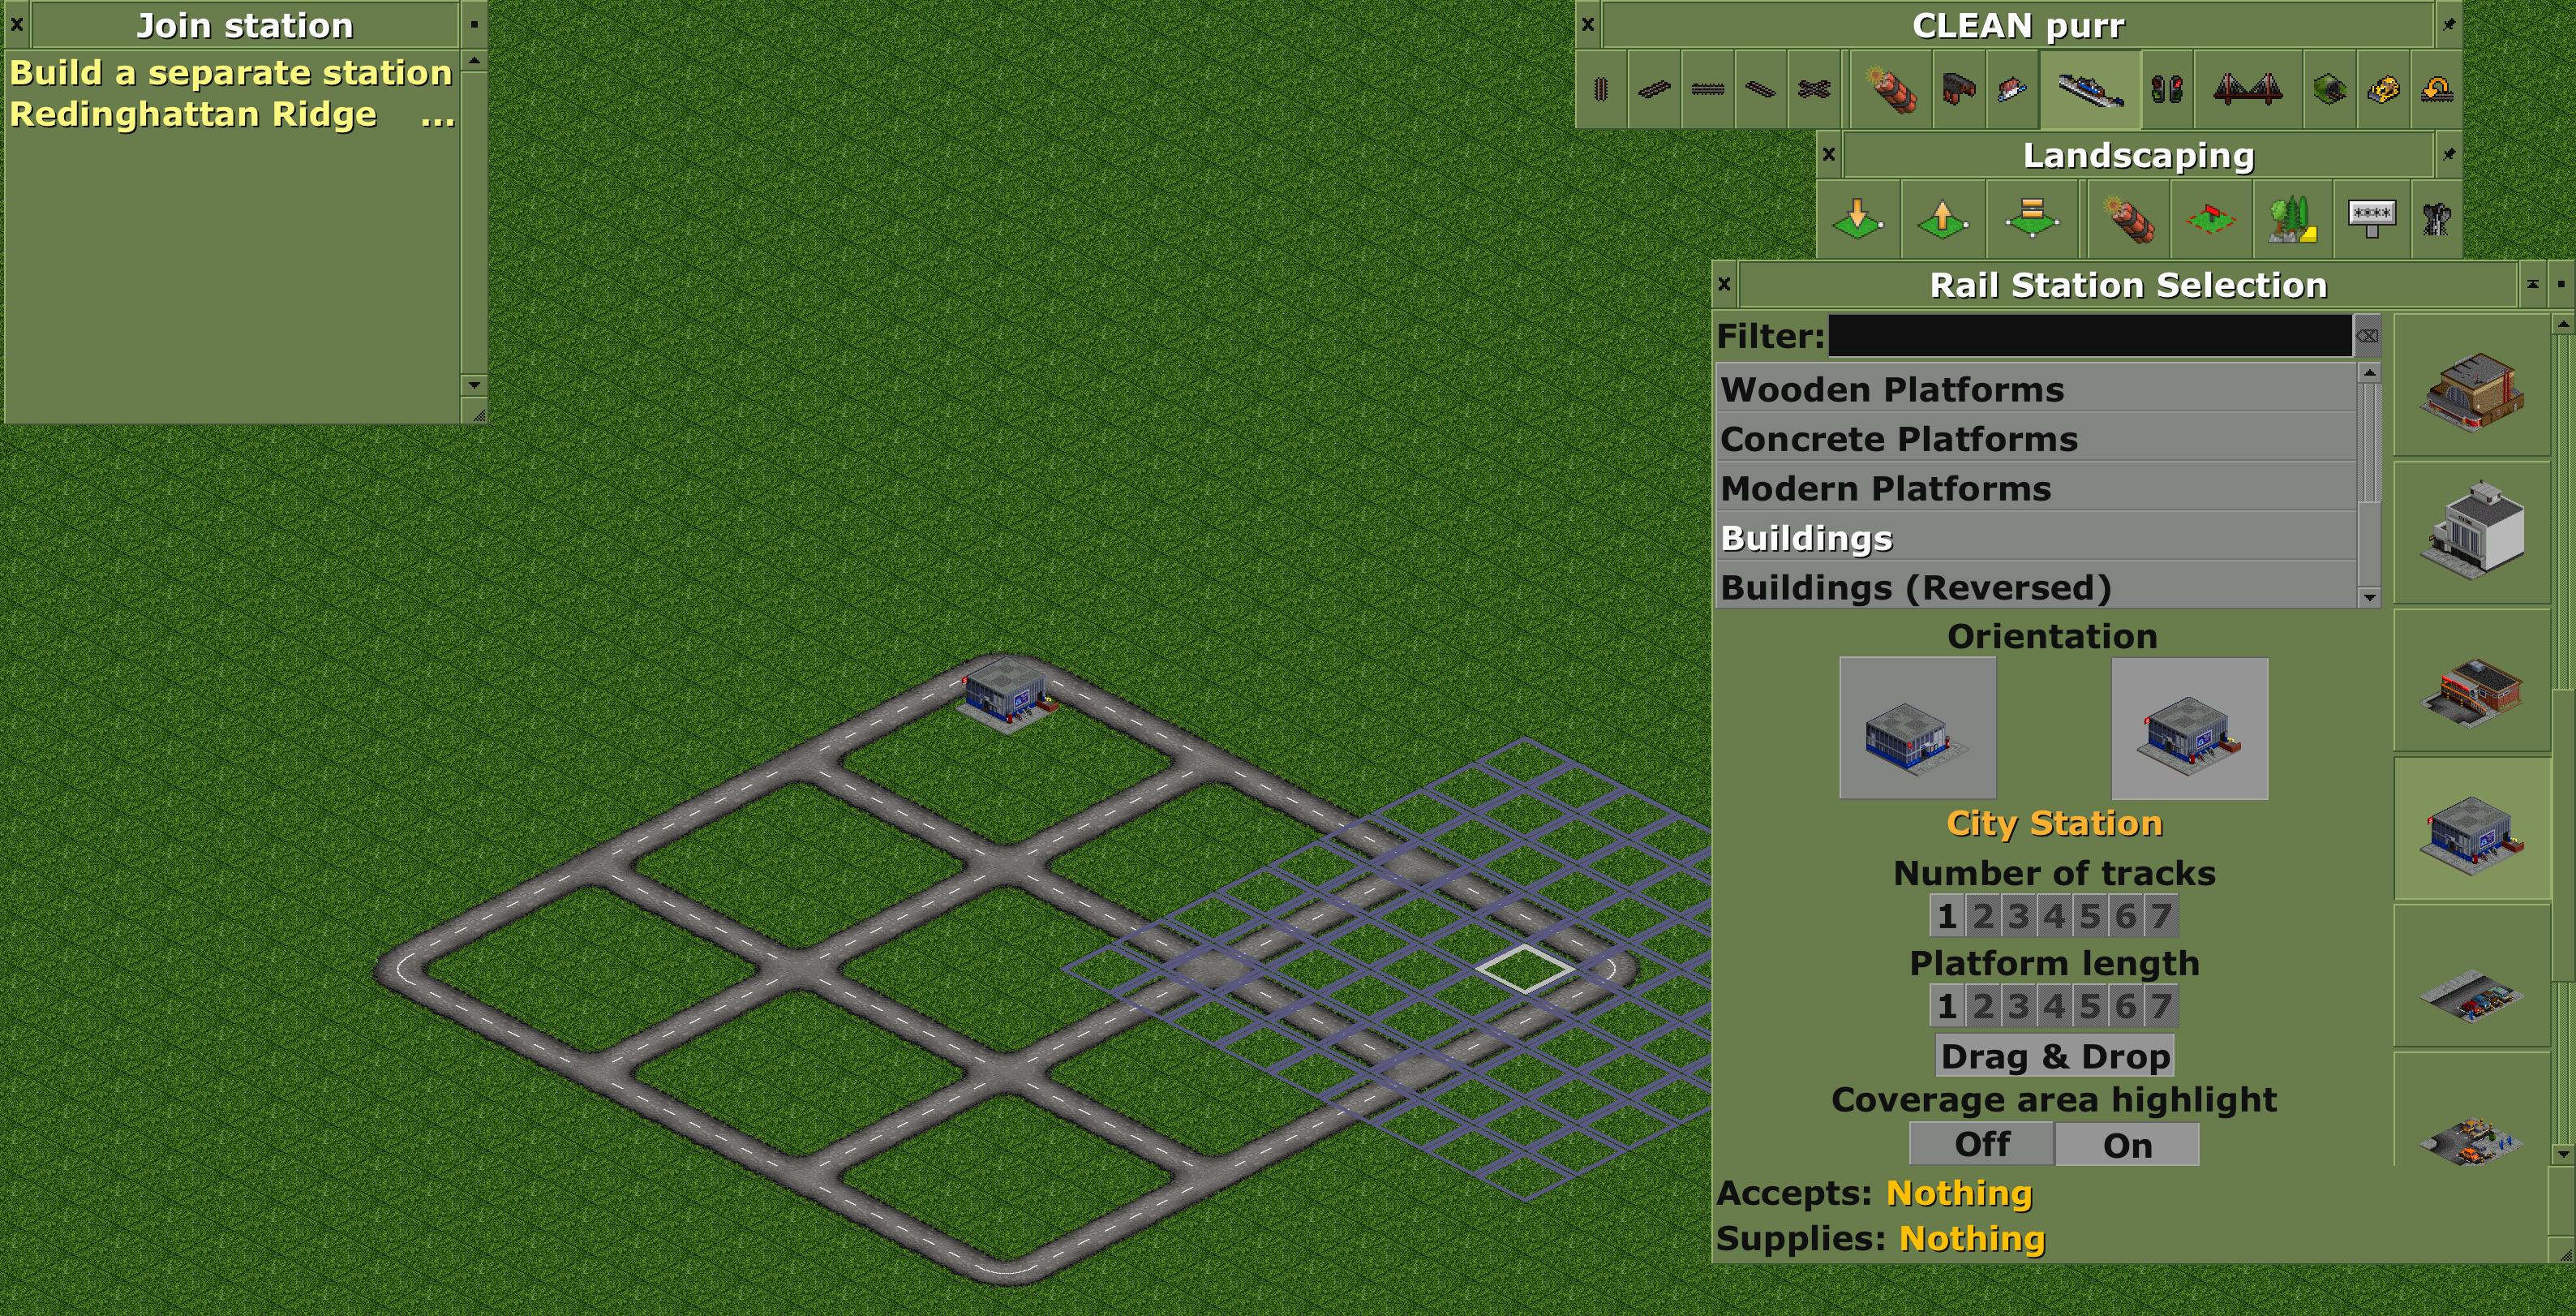
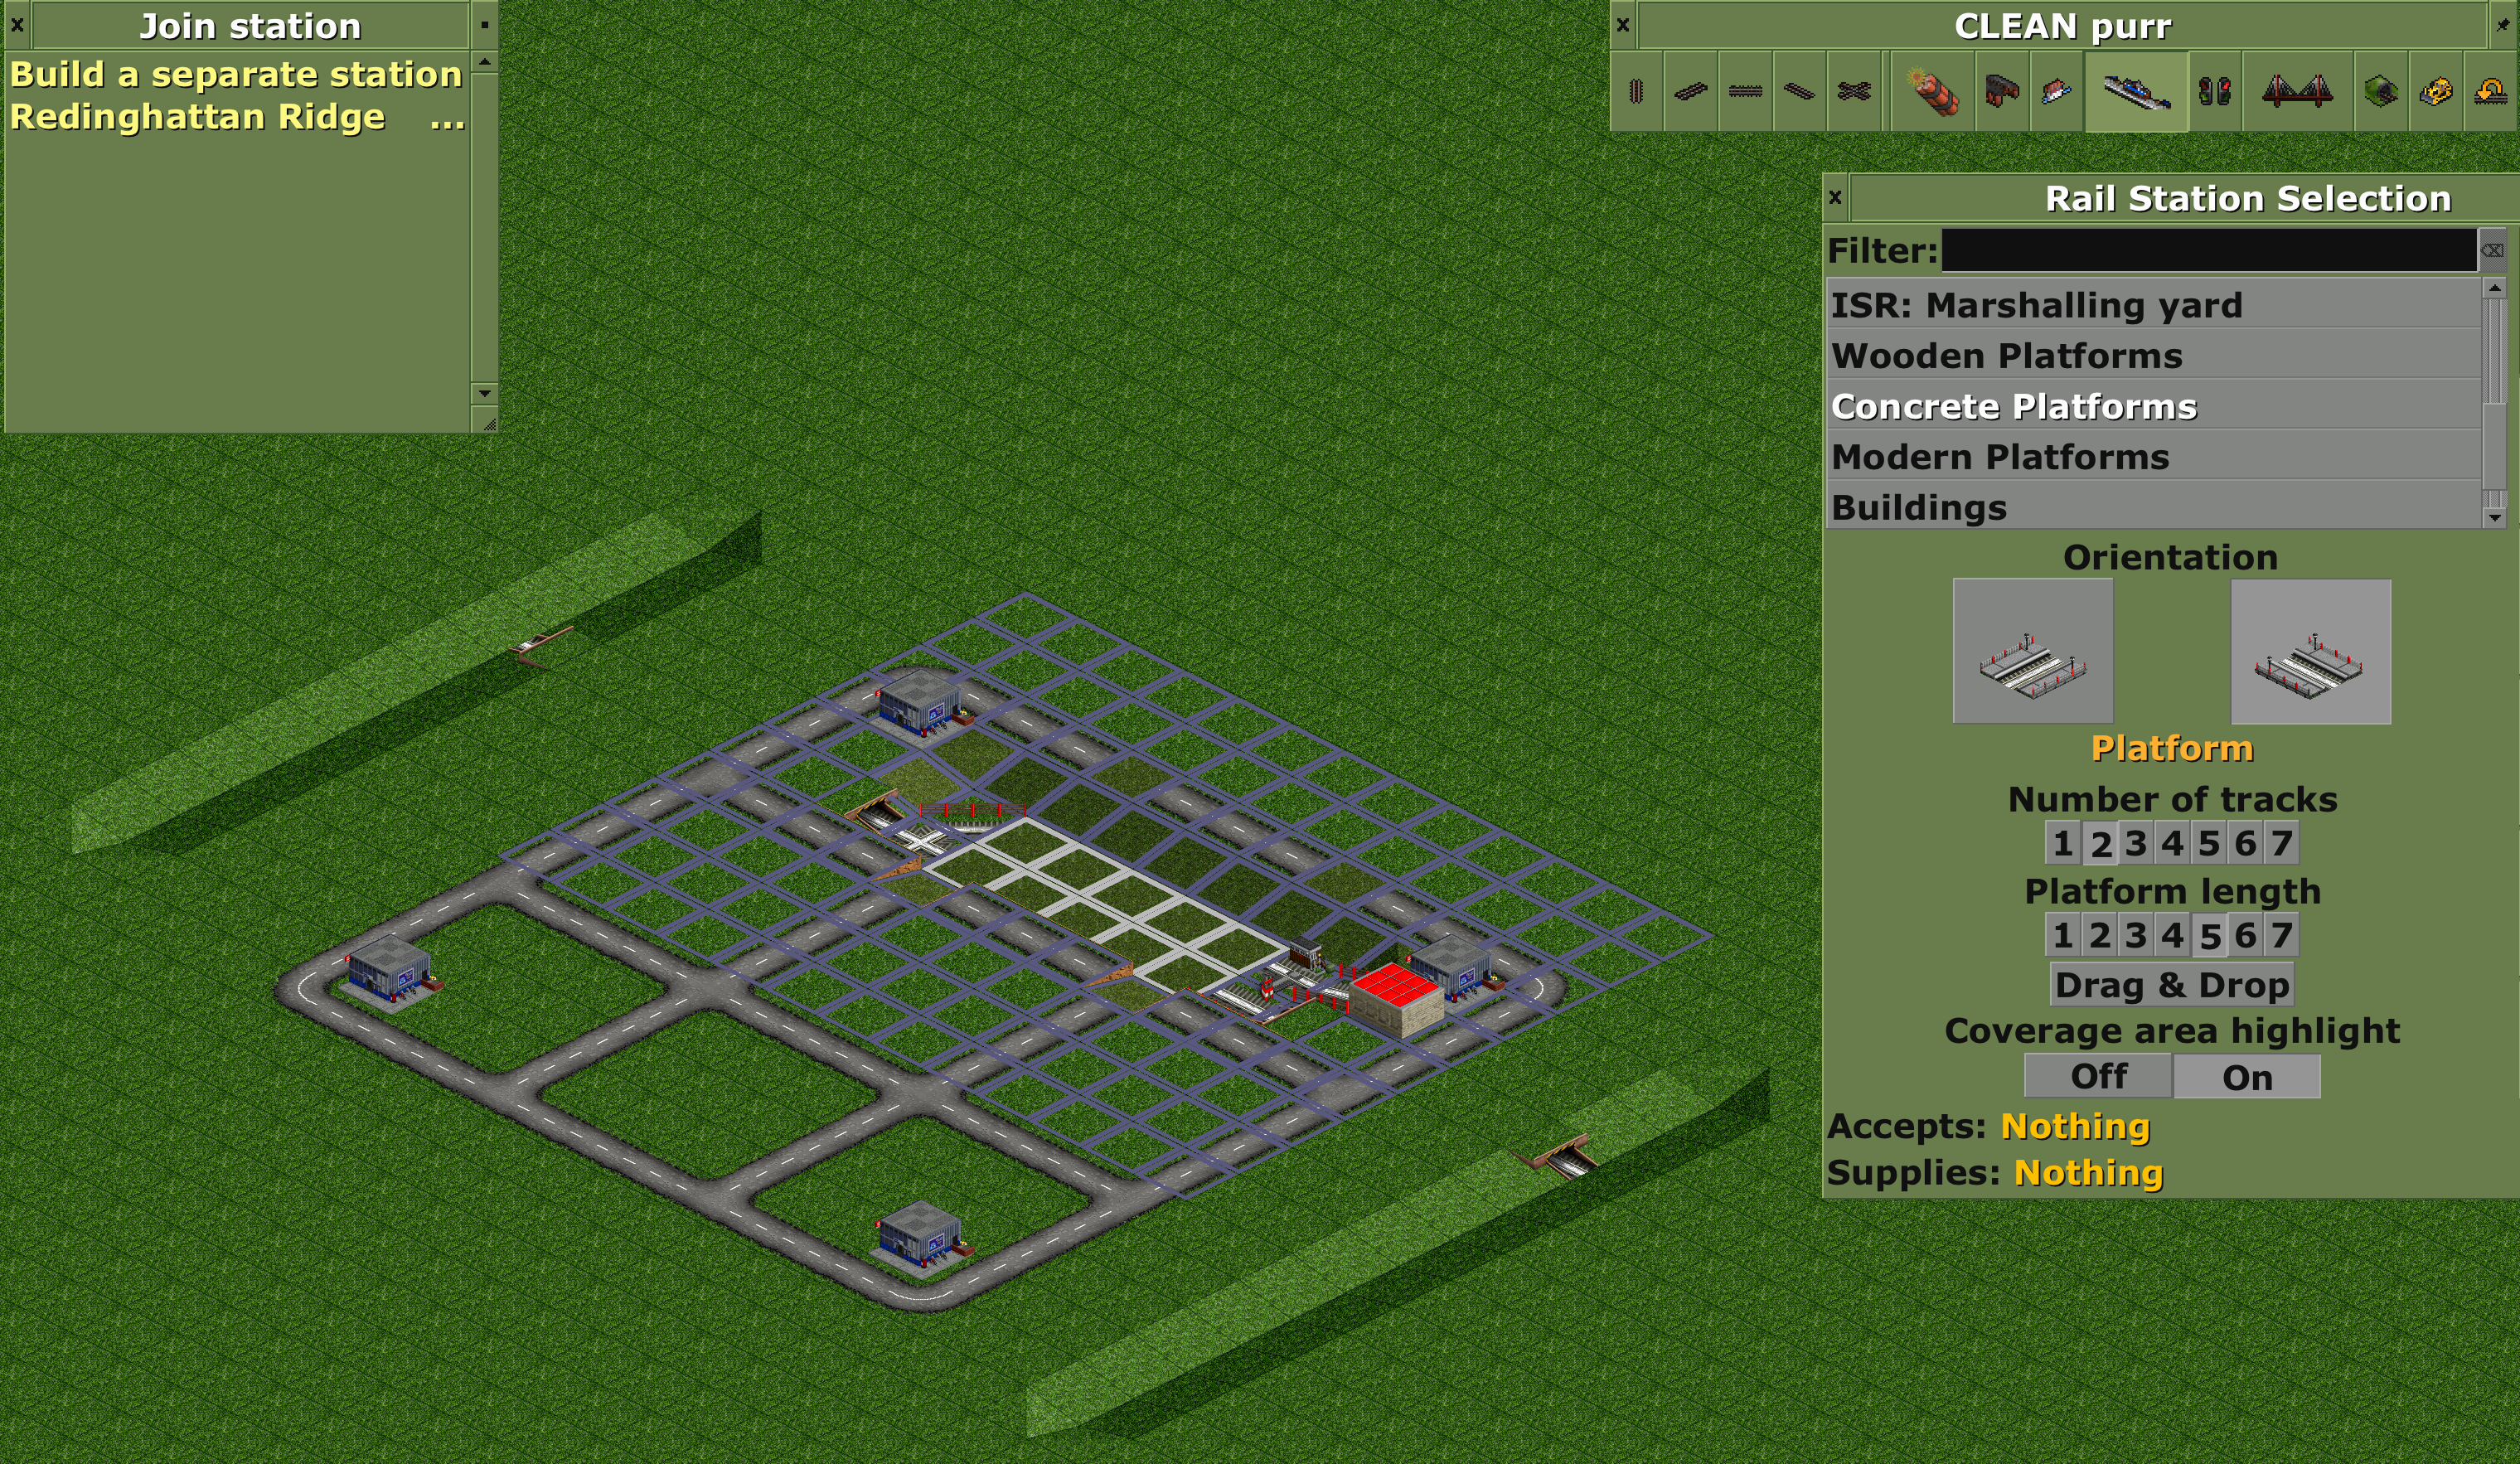
We are building a spread station in a 3x3 block by putting a city
station in each of the corners of the block. Holding ctrl while
placing the building opens the "Join station" menu and we select an
existing station.
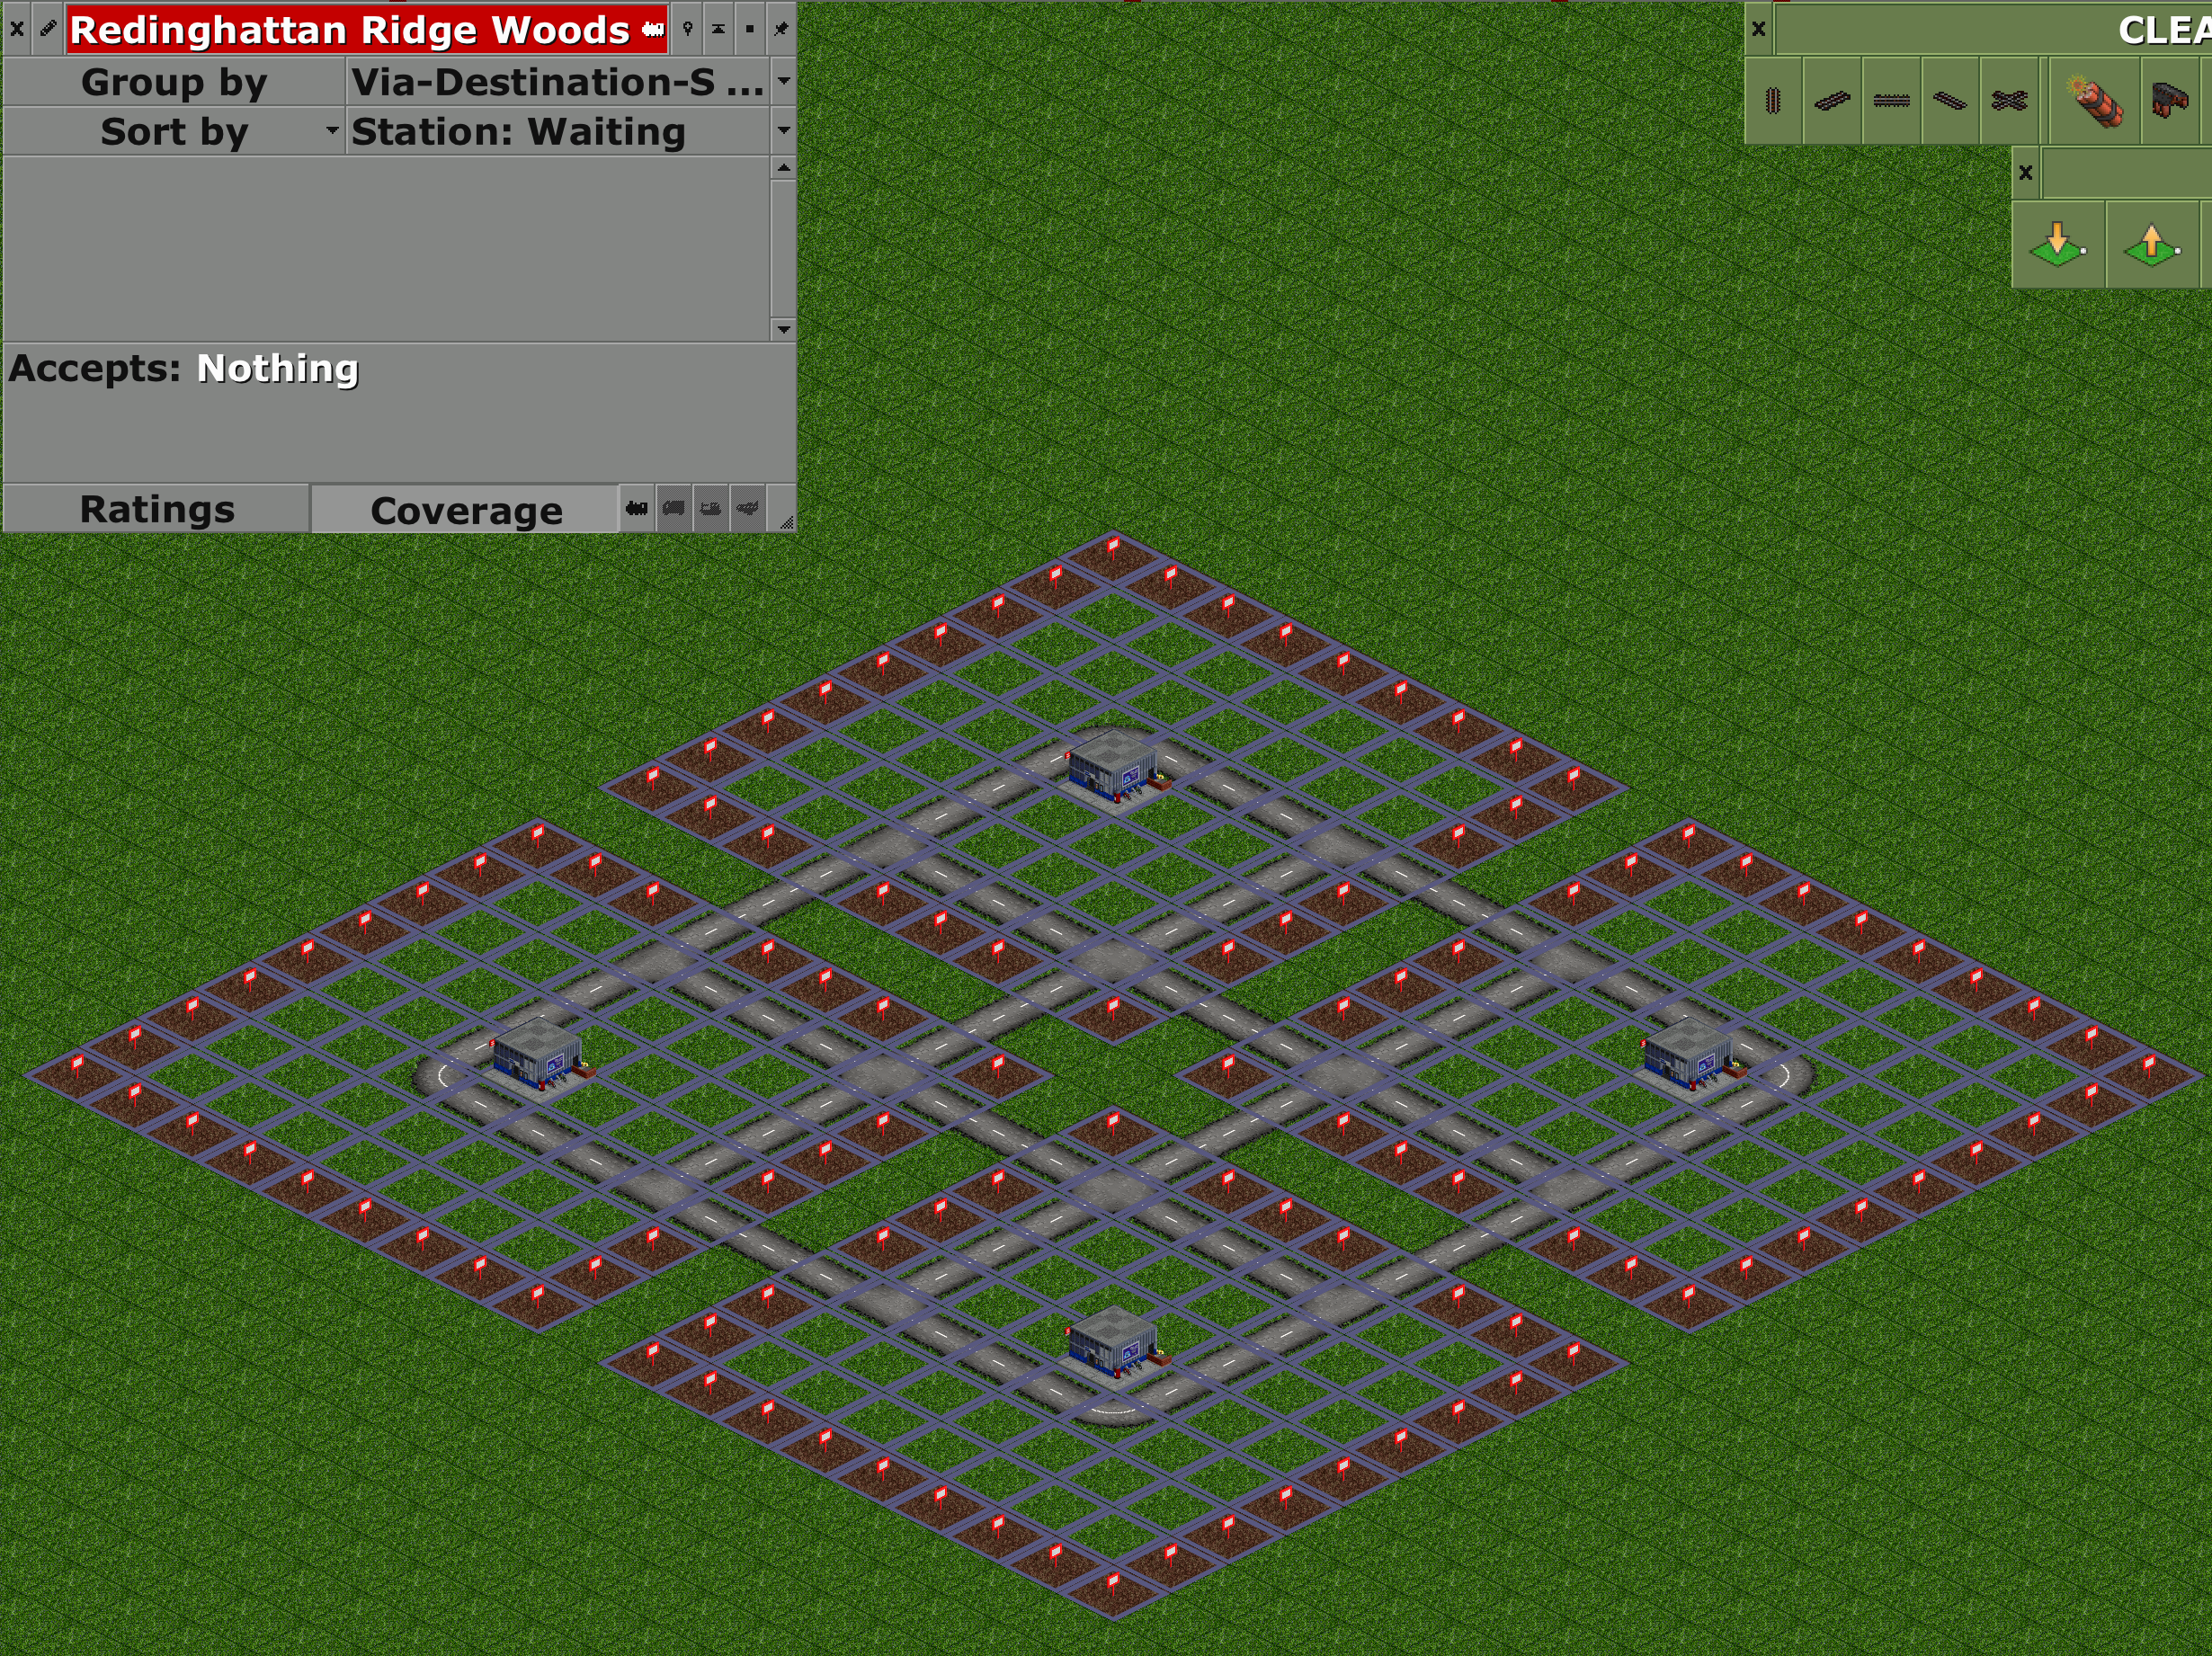
The coverage of the station is not perfect but some of these parts will later be filled by the tracks of the train station. Note that the station also covers a block outside of the road grid, so each spread station covers a 5x5 block. This is important when putting in adjacent stations to not have them overlap.
For the rail network we dig two trenches outside of the city. Tunnels to those will connect the station to the waiting loop on one side of the city and the exit to the transfer station on the other side of the city.
We then remove some roads and the crossings5 on one side of the block and dig a 7x2 hole for the train tracks.
Next: Tunnels, tracks, signal, a way-point, and a train depot.
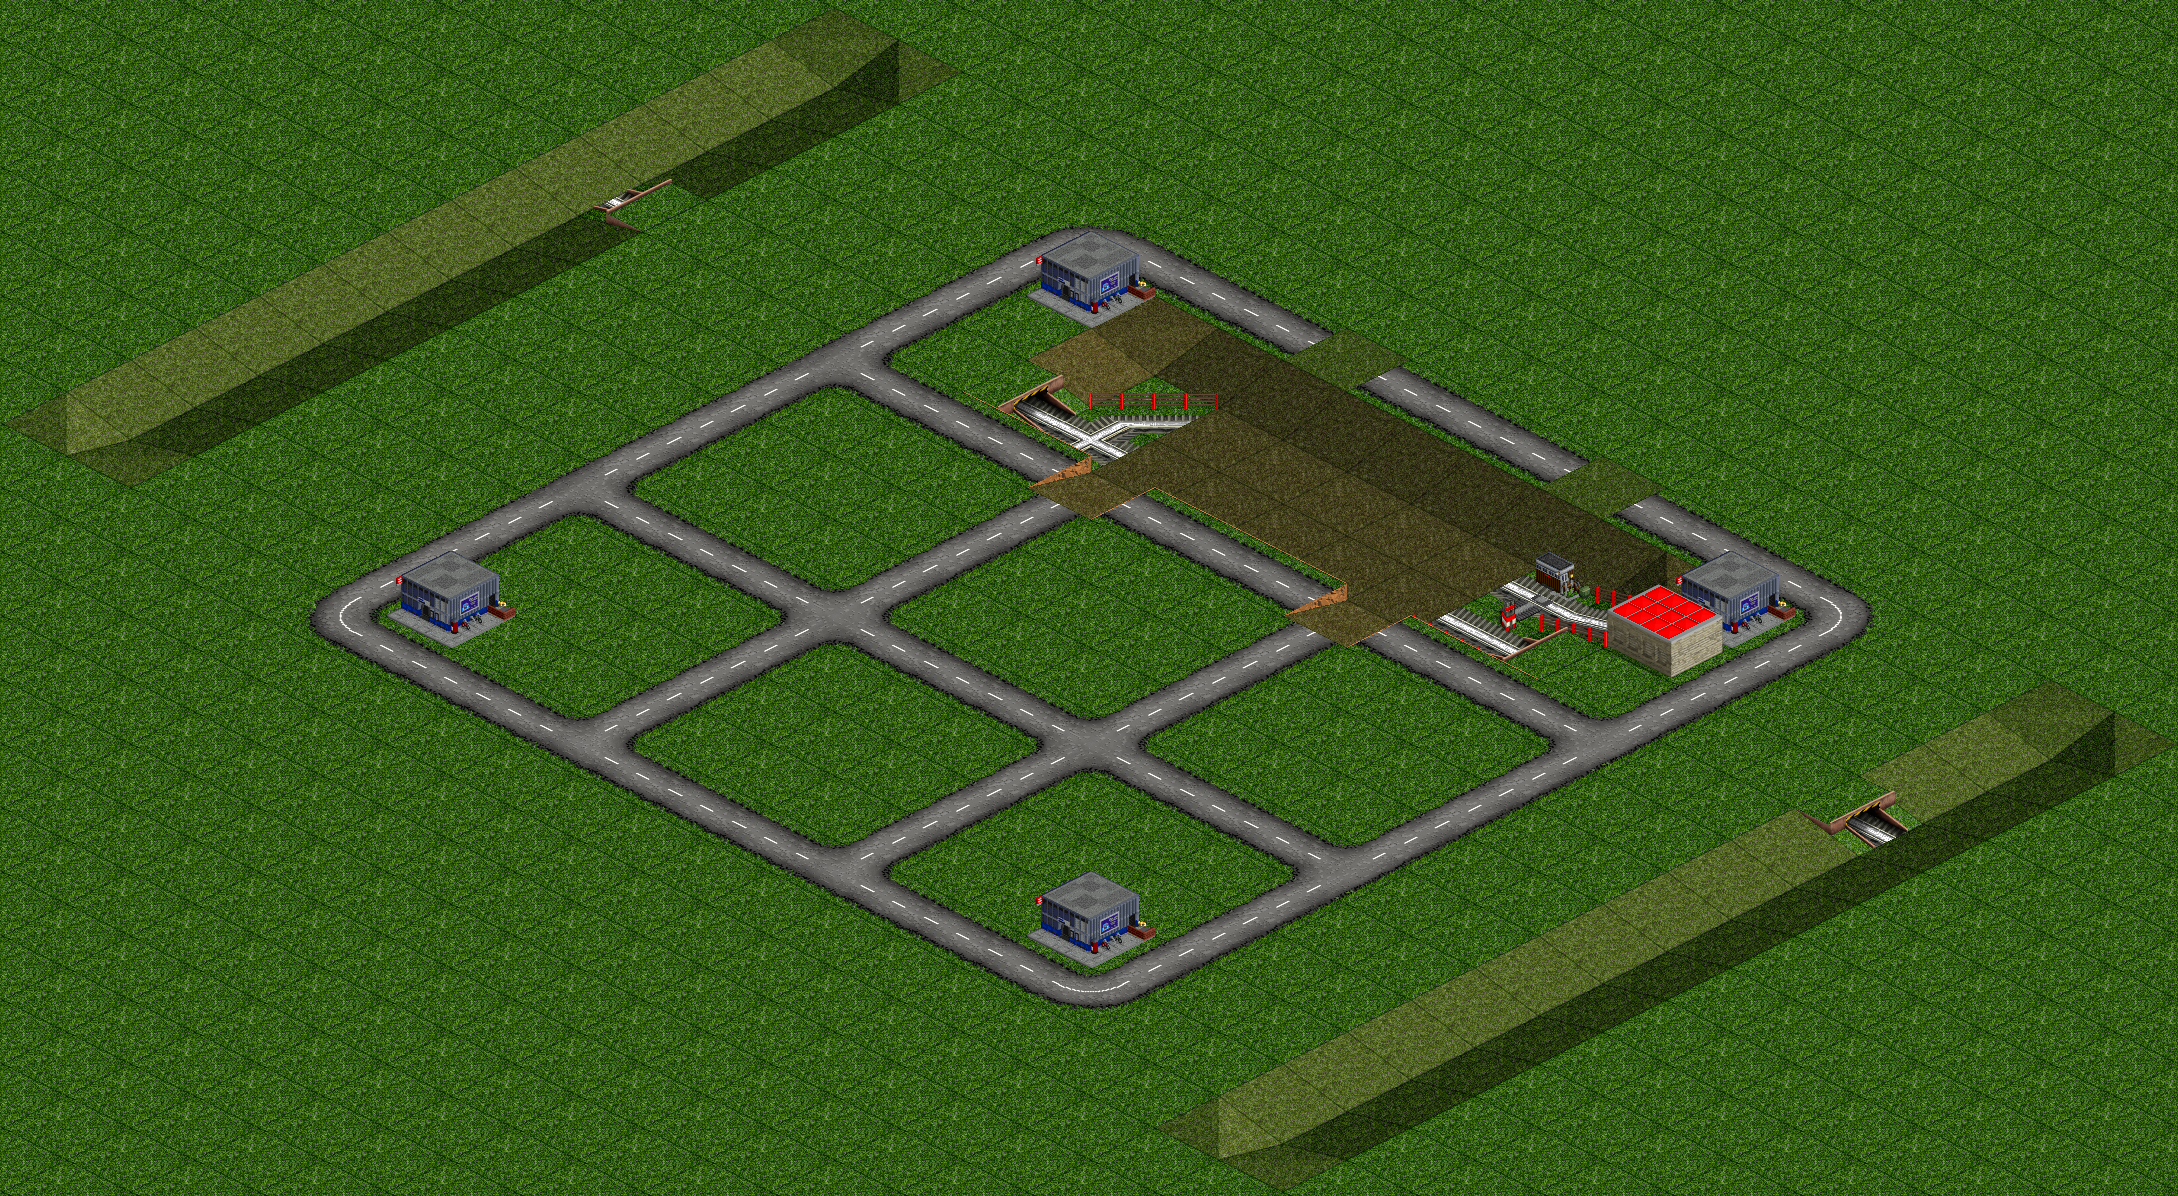
We then place a two platform, length five station, making sure we join it with the existing spread station.
The finished station looks like this:
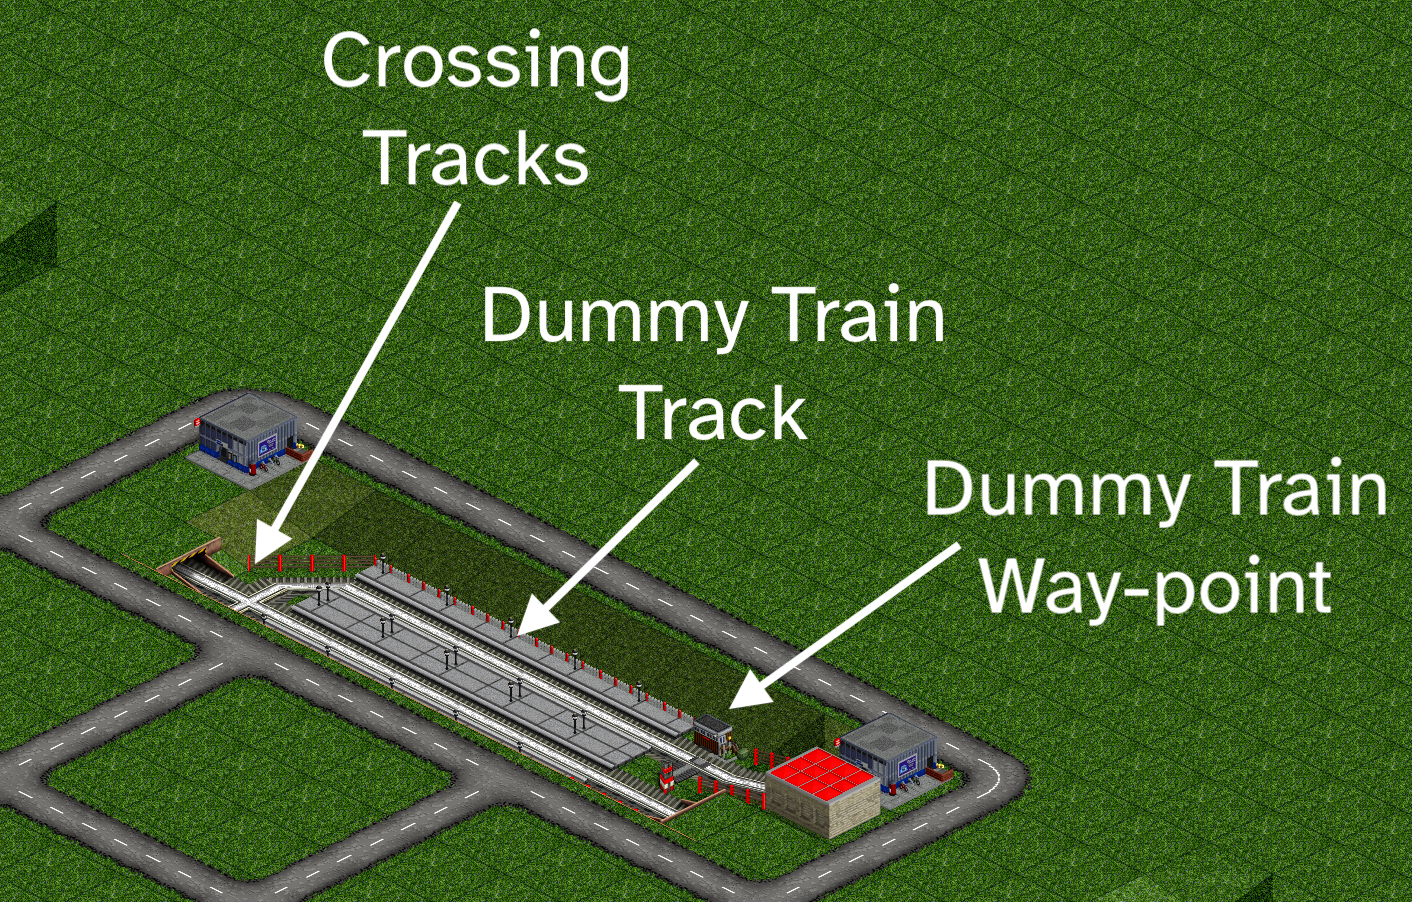
We are going to put a dummy train onto the dummy track to pick up passengers and making sure a full load is available when a pick-up train arrives. We do not place exit signals at the station. When a dummy train is inside the station it blocks the whole station due to the crossing tracks at the end of the station. The way-point is going to be used to open the station for the pick-up trains.
Train Orders
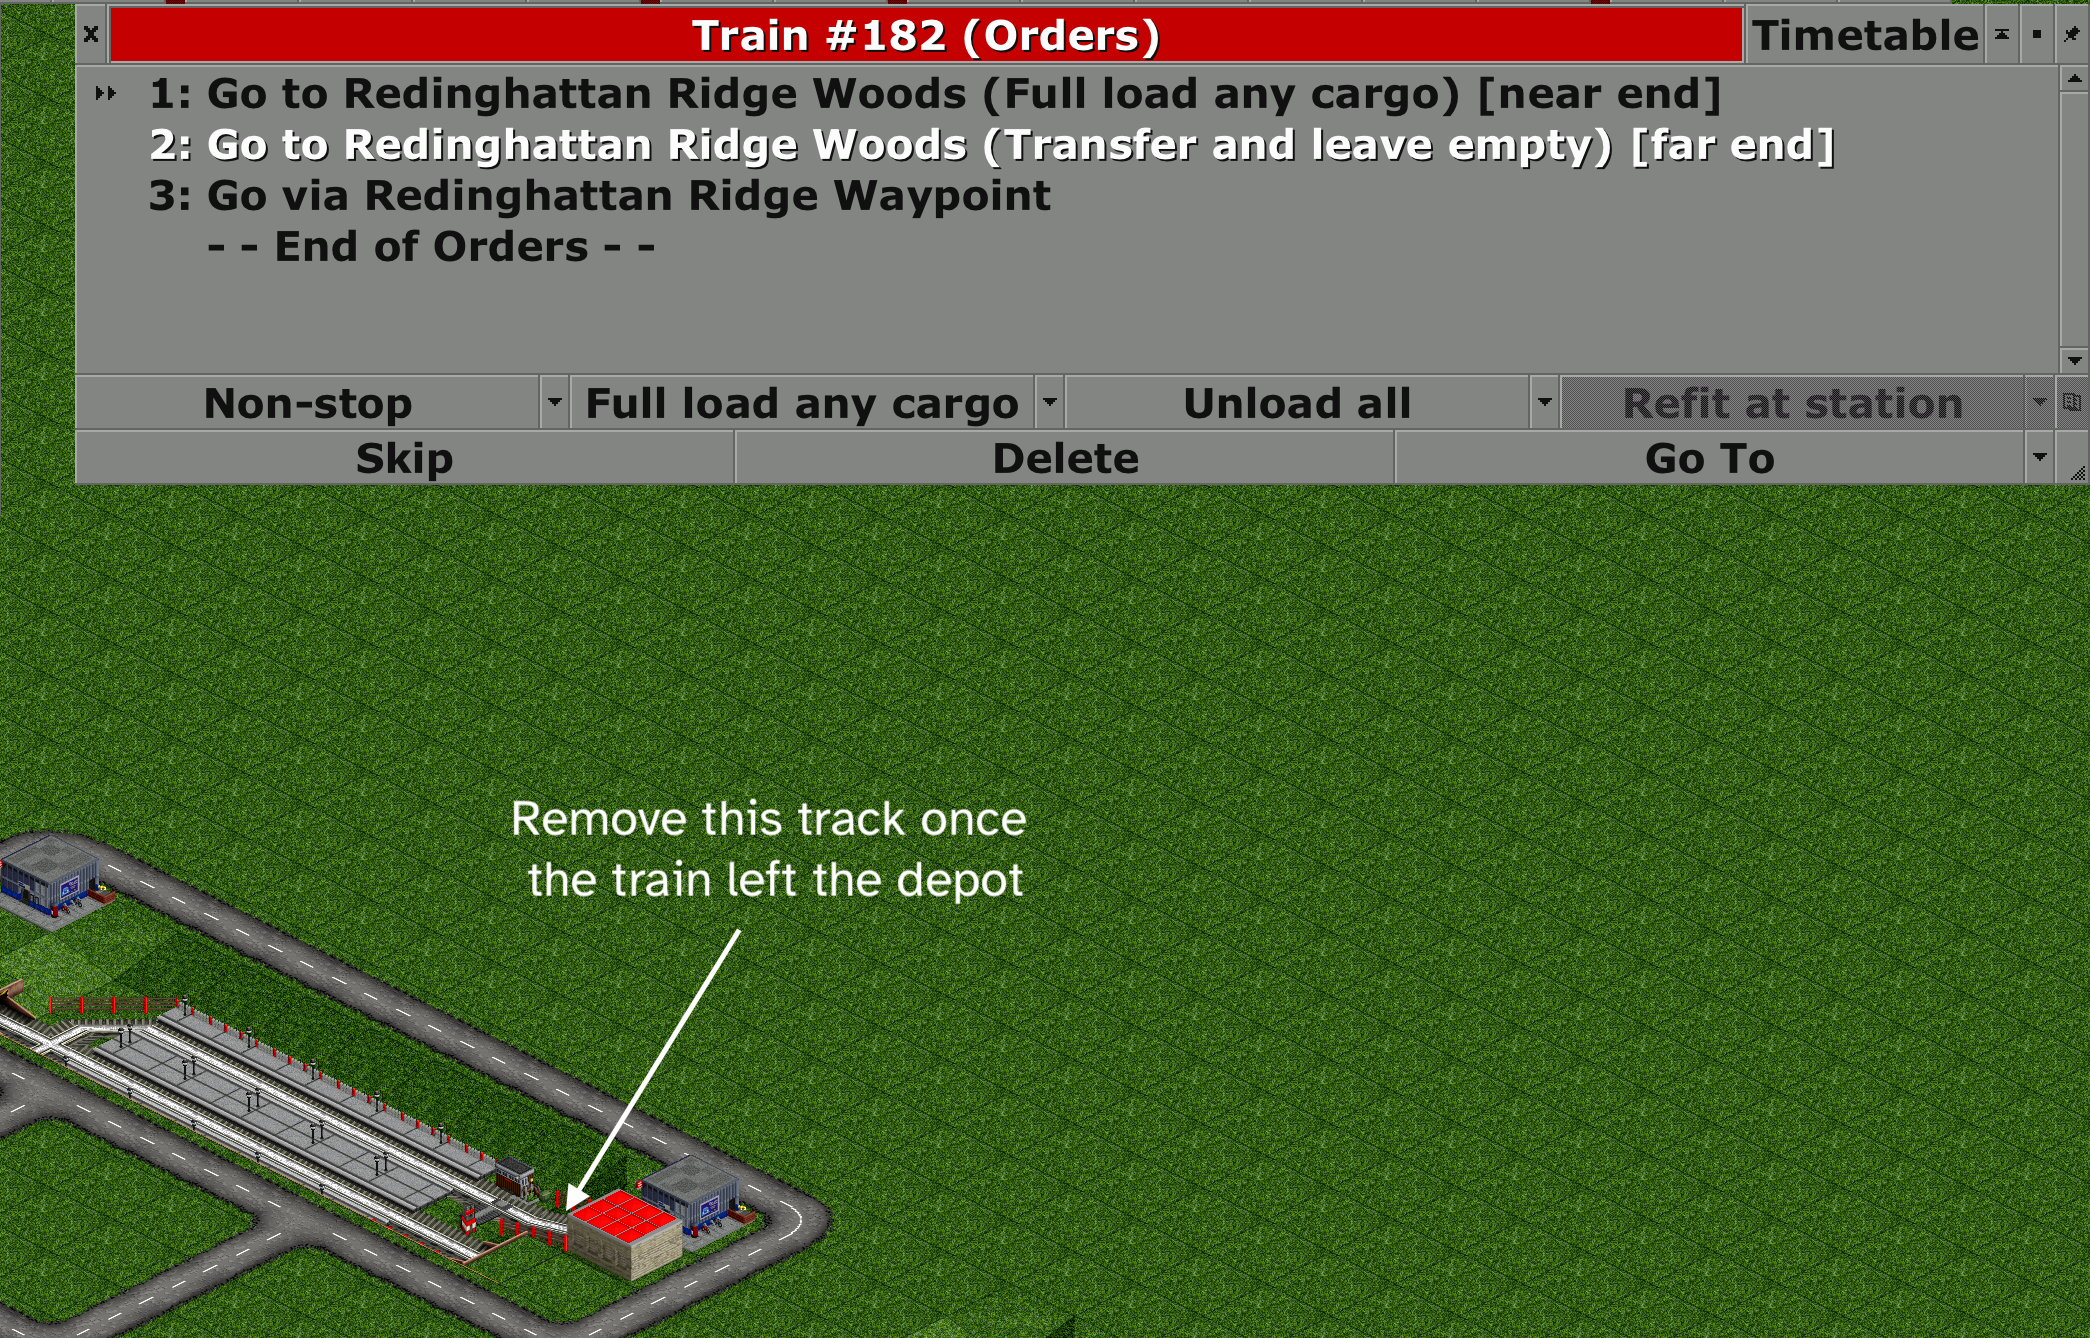
Dummy Trains
We create a dummy train per station. These collect passengers and block the station for the pick-up trains. Once a full load of passengers has been collected the dummy train unloads them and unblocks the station. Now a full load of passengers is available for the pick-up trains.
We make the trains length four so that it can drive around in the station itself, which has length five. We are using "near end" and "far end" orders:
- Go to near end of the station and full load
- Go to far end of the station and transfer
- Go to the way-point after the station.
Step three is what unblocks the station. Once the train has left the depot we have to remove the track right in front of it so that the dummy train cannot re-enter the depot. Alternatively we could put the depot right after the way-point and delete it after the train left it.
Pick-up Trains
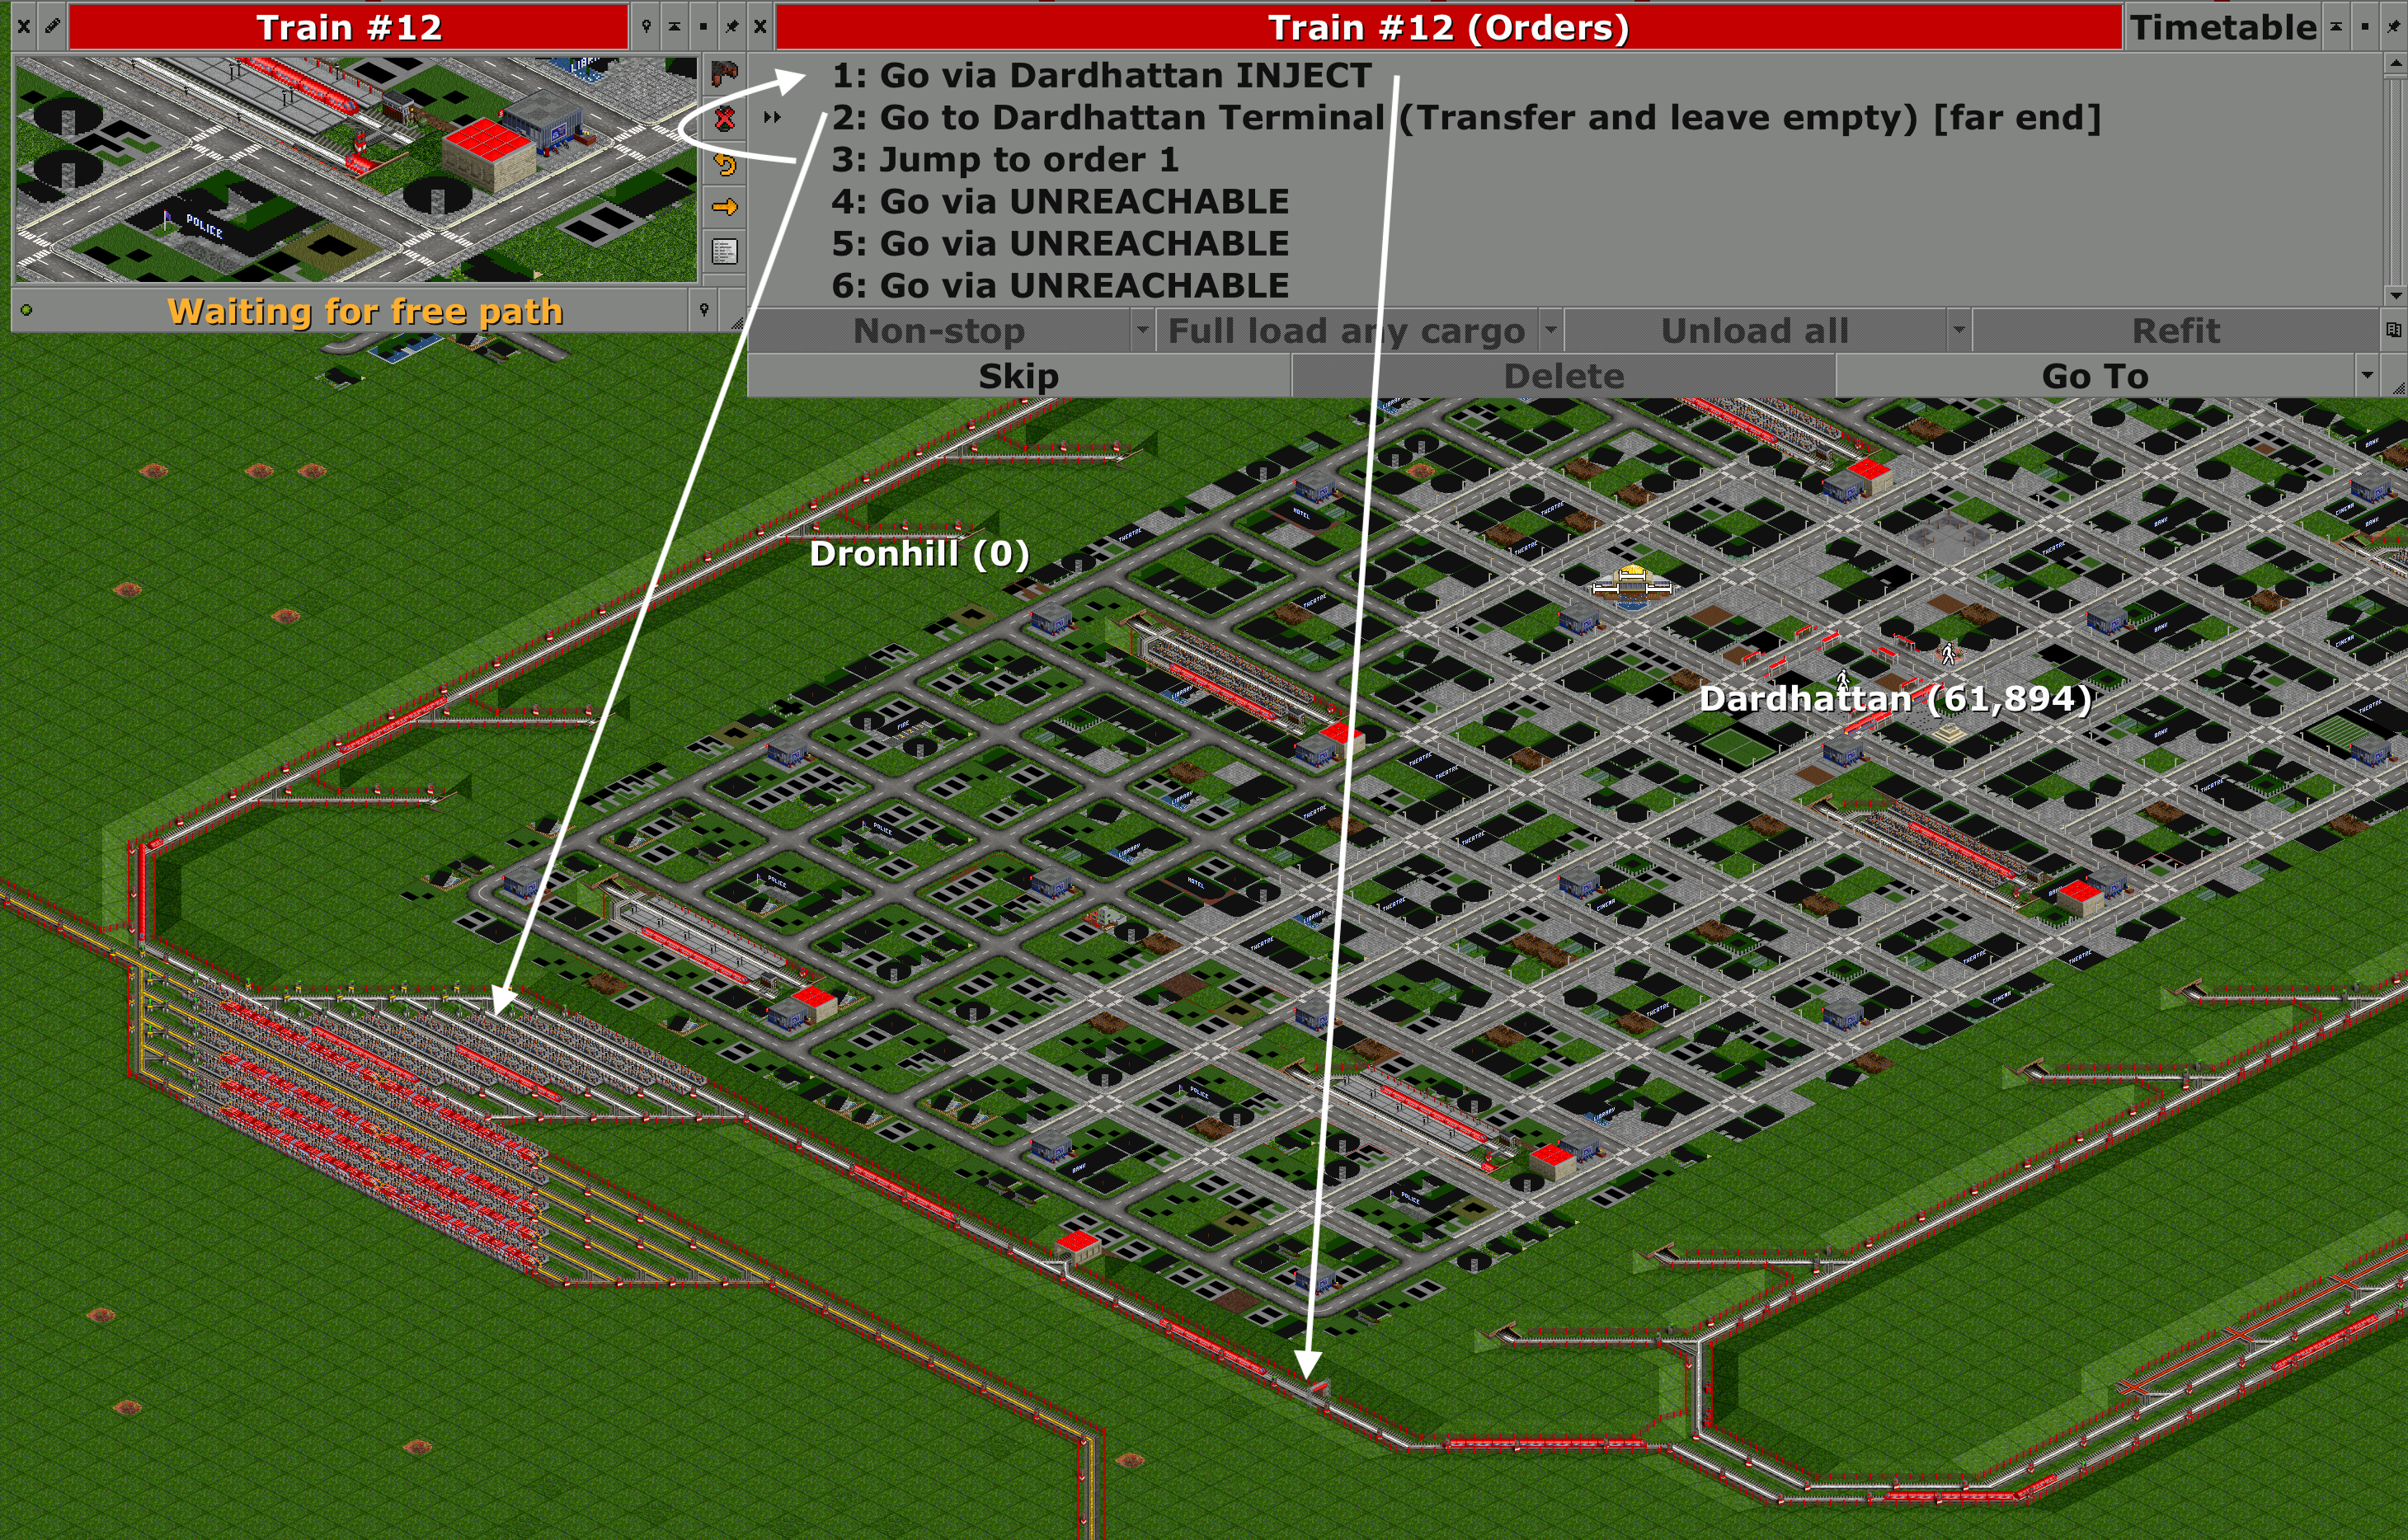
The pick-up trains have two orders:
- Go via INJECT way-point
- Go to transfer station and transfer.
Unfortunately OpenTTD will create implicit orders every time the train passes through one of the SBahn stations. To prevent this we add a "Jump to order 1" instruction and then fill up the orders with an unreachable way-point. A train can only have 255 orders. Once the order list is full no implicit orders can be created.
Self Regulating Network Signalling
The interesting bit happens once the trains passed the INJECT way-point. They are now inside of the waiting loop and try to get to the transfer station. This is only possible through one of the SBahn stations.
When a train reaches the tunnel entrance to an SBahn station it has two choices, either continue in the waiting loop or enter the station.
If a train is already in the waiting bay of that station we want our train in the waiting loop to continue and try the next station. We put two-way block signals at the tunnel entrance which turns red when the waiting bay is occupied by a train. OpenTTD's path finder treats a red two-way signal as a dead-end6. It has an infinite penalty and any other path will be better. Our train continues. This is the first block signal in the picture below.
At our second SBahn entrance the waiting bay is free and the block signal shows green, so a train should enter the waiting bay towards the station. However, the path finder sees that the path goes through a station. Going through a station incurs a penalty for that path and it might so happen that the path continuing in the waiting loop is considered better, our train would not enter the waiting bay.
We need to add a penalty to the waiting loop path to make the path through the station look better. We do this by adding a few reversed path signals after the choice.

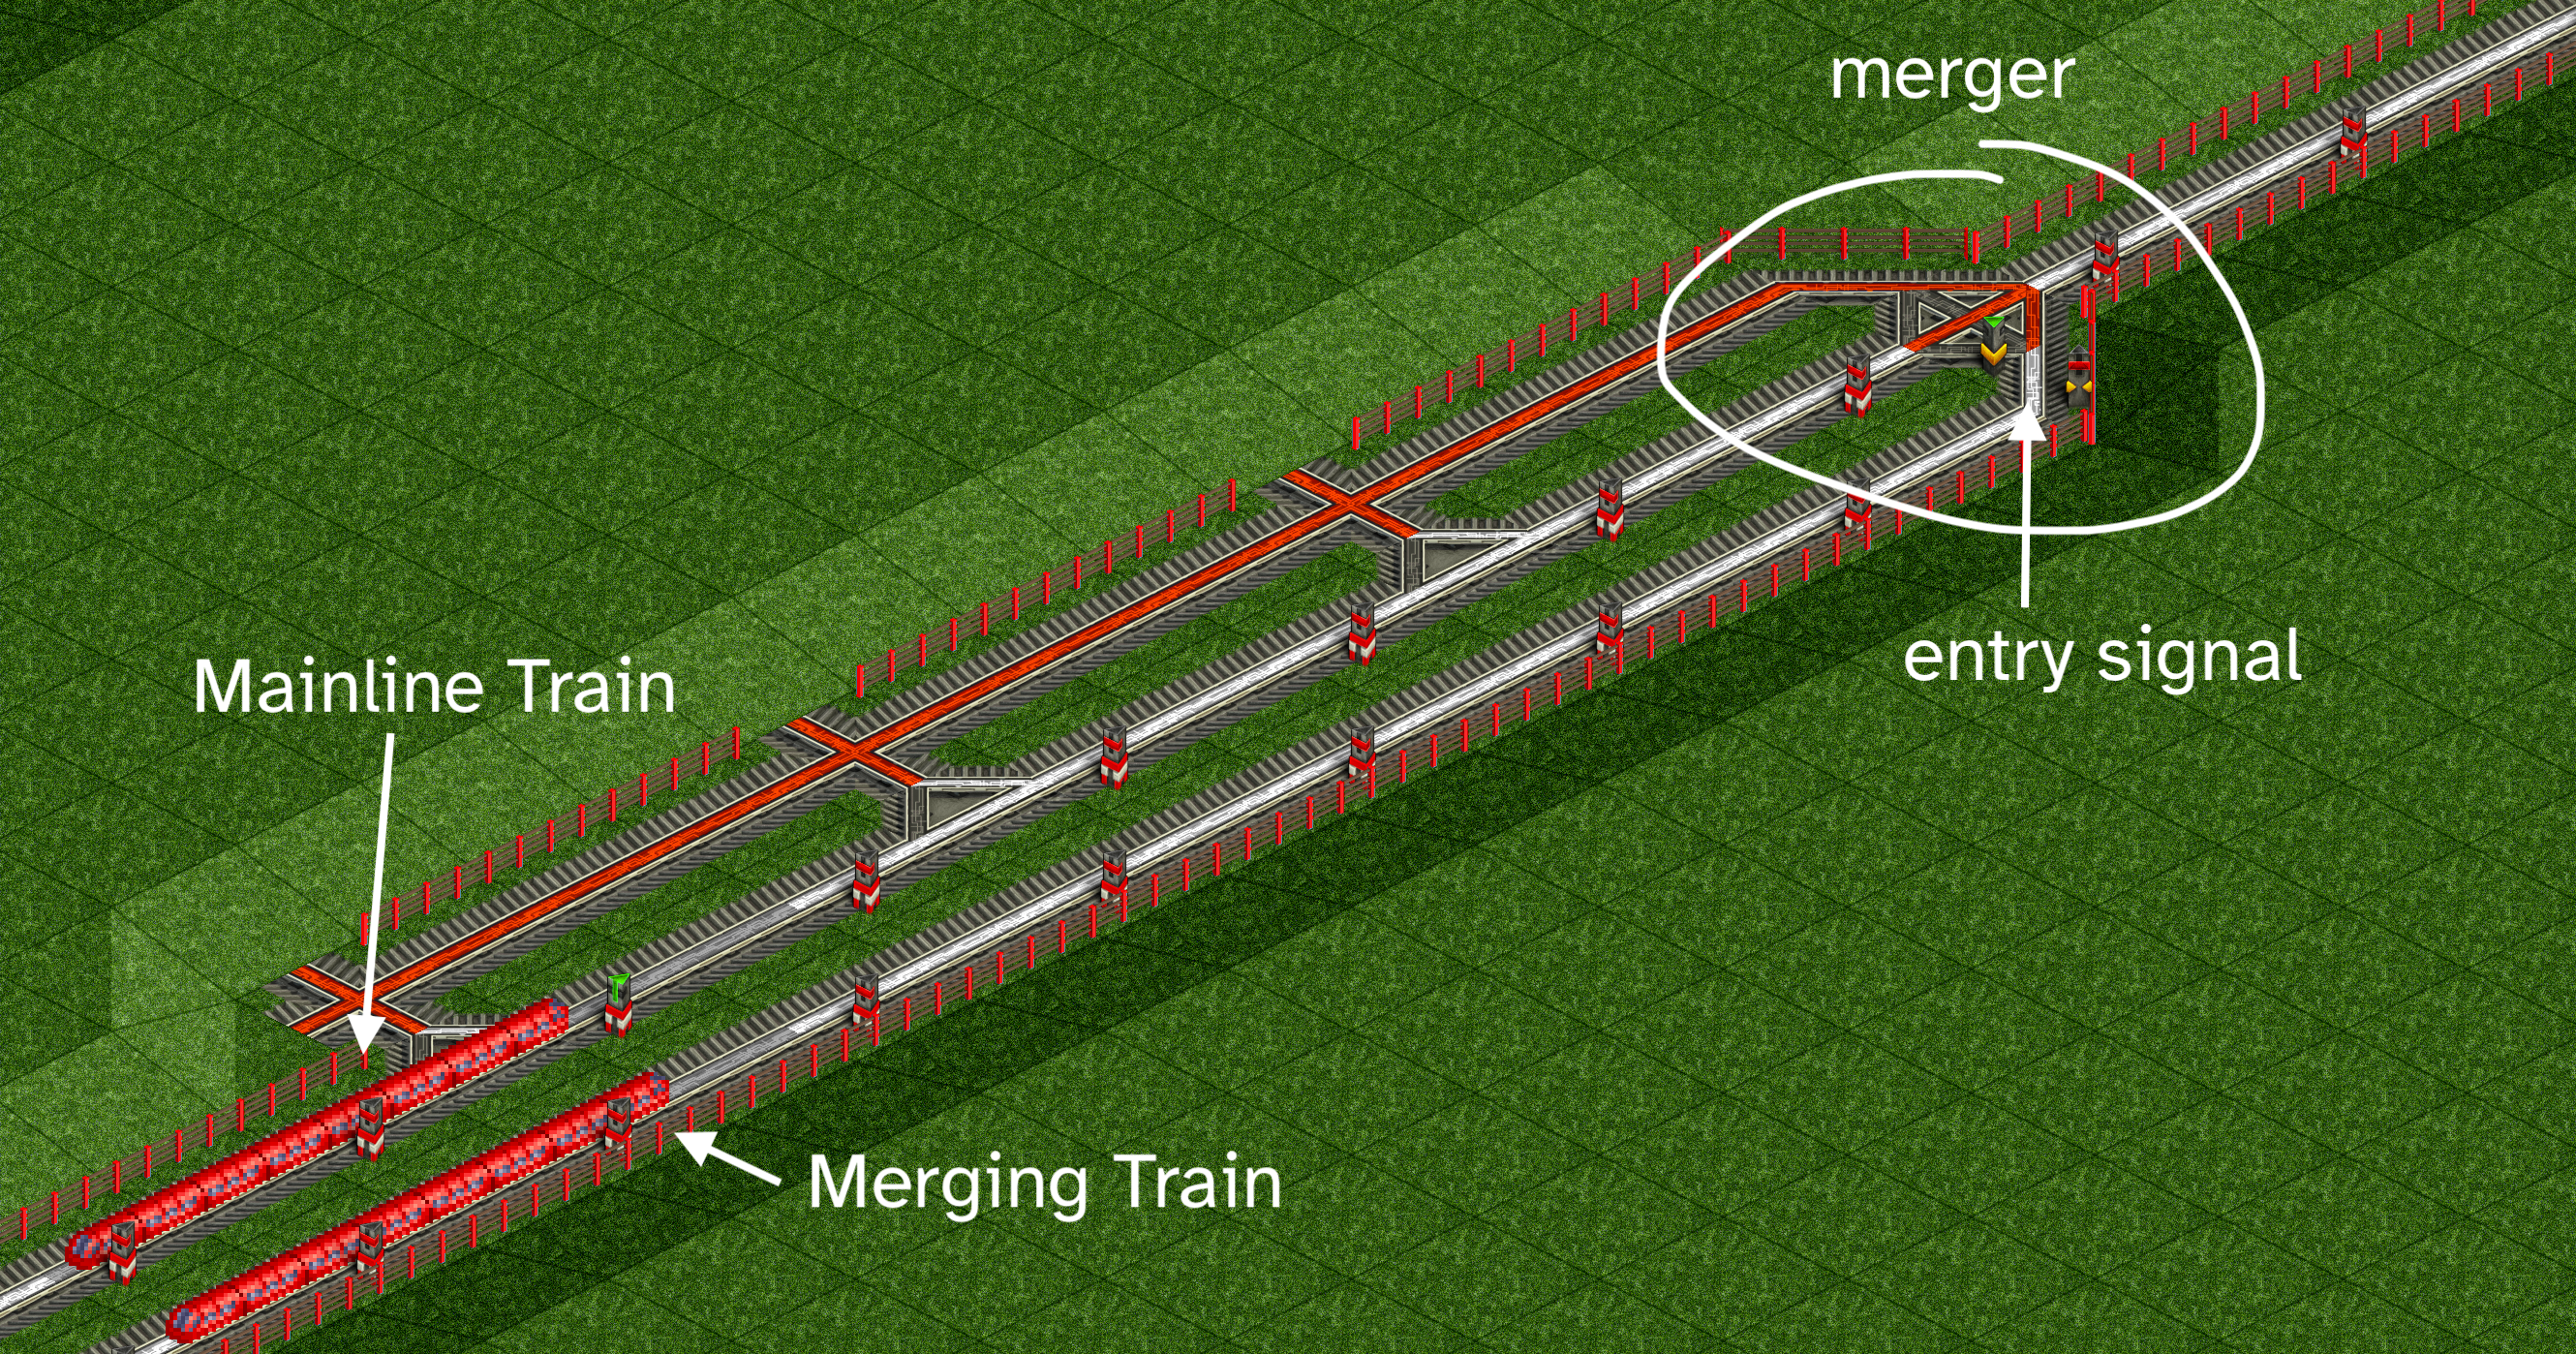
Bonus: Path Based Signal Priority Merge
The Priority - #openttdcoop wiki article shows how to construct a priority merge using path based signals. Since I will likely forget it and the traditional priorities are slightly more difficult to build I put a note here.
The way this works is that the tracks coloured in red form one big signal block that reaches all the way to the merger at the front. Once the mainline train enters this block the entry signal for the merging train turns red and the merging train has to wait for the mainline train to clear the block.
Epilogue
After many iterations I came up with this city layout and station design. It is probably not the best one and different trade-offs can be made. The most fun in OpenTTD is to figure these things out and not just copying a design from somewhere. When I come back to playing OpenTTD in a few years I can start from this and try to improve on this and do not have to re-discover all this the hard way.
Footnotes:
which is quite dense
One constraint here is how much space the station takes away from the city to build houses.
A block is a 3x3 road grid.
Three in a line would also leave enough space for tunnels. But then the waiting loop might become too big and it takes to long to try all the SBahn stations. This is especially a problem once the city is big and produces lots of passengers.
This ensures that we can dig a complete hole, we will put the roads back in later.
This is only true if
yapf.rail_firstred_twoway_eol is True. This is the default in
OpenTTD 13.